This is seriously one of the best and most creative projects I have ever seen! I just want to make a few dozen and hand them out to everybody I know. Because, let’s face it. I am a chronic bobby pin loser. And if you are anything like me, you are too. So check this out!
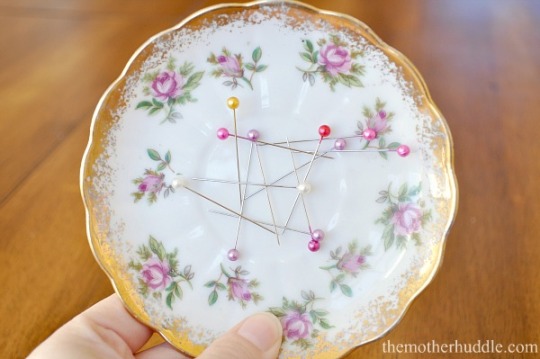
Yep. It’s a plate with four disc magnets glued to the bottom with E-6000 glue. That means that once you put those safety pins or bobby pins or sewing pins down, they aren’t getting back up until you say so. Who’s ready for Christmas presents?
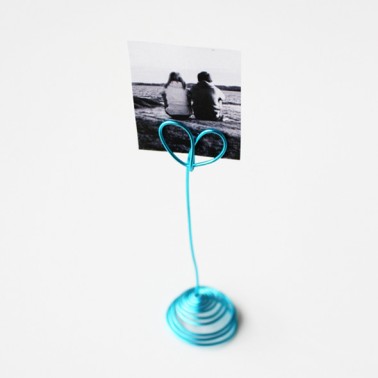
Is this not just the most precious thing? It’s a nice and simple switch from having picture frames everywhere, too. You are only going to need three things for this project: round nosed pliers, a wire cutter, and a long length of wire in the color of your choice. This is how you do it…
1. Create a small loop using the pliers. Twist so that the wire becomes a swirl shape. Keep going until your swirl is an inch in diameter.
2. Thread the wire through the center of the swirl.
3. Pull the wire through will pushing it through on the other side, making the swirl a cone [if this doesn’t make sense, look at the picture of the base above].
4. Make a loop at the end with an inch of wire left.
5. Bend another loop next to the last [it should look similar to a heart].
6. Bend the end up underneath the heart so that it will hold your photo in place.
Do you have too many shoes and not enough space in the floor? Heaven knows I do! The lovely ladies at Oh So Pretty give a wonderful tutorial for a brilliant solution to my footwear woes. Here is what it looks like:
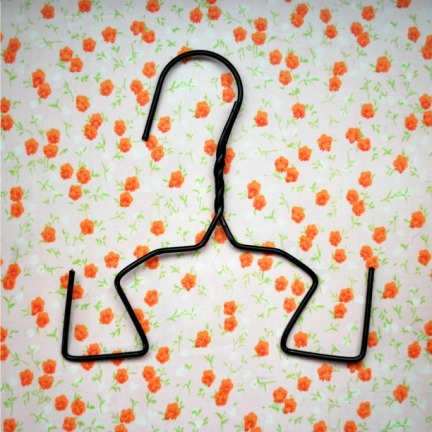
Granted, it may not be the most attractive contraption, but ingenious it most certainly is. So, if your shoes need relocating or you just like hanging stuff up, follow these simple instructions:
1. Buy a package of wire coat hangers.
2. Cut the bottom part off.
3. Bend the ends downward and together, like so…
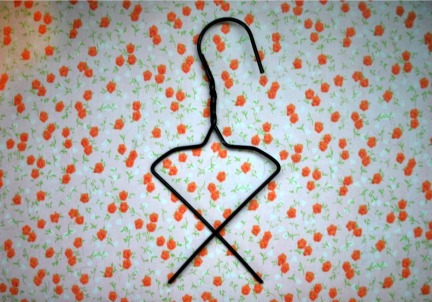
4. About 1/3 of the way down, bend the wire back up. Repeat further down so that it looks like the example at the top.
5. Hang your shoes up. The end.
I really like the idea of using things that you have laying around the house to make other – and more pretty – things. I think that covering an old container in cord is a perfectly clever way to add some texture to any desk or bookshelf.
 All you really need is an empty cylindrical container (these happen to be empty tin cans and whatnot), a hot glue gun, and rope/jute cord.
Again, it’s not complicated. You’re just going to secure one end of the cord/rope to the bottom of the can with the glue, and then wind it around and around and around until you make it to the top. You will have to glue it every now and then, just to make sure that it is secure, but once you glue it at the top, you’re done. Let it dry and put some flowers or pencils in there.
You know those extra buttons that come attached to new clothes? Well, I have a confession to make: I have a small collection. I mean, it’s not like I ever sat down and said, “I’m going to collect buttons” because, let’s face it, that’s a little weird. I just have a mild case of hoarding. I have issues throwing things away – for real! So, what better way to spruce up my banged up mini-fridge than with some adorable little button magnets?
 Your materials will include a hot glue gun, magnets, and some buttons. Yep, that’s it. Just glue the magnets and buttons together, let them dry, and you can start hanging stuff up.
I’m a reader. I love books in the way that little old ladies love their cats and morning coffee. It makes me sad when people say that they don’t like to read – or worse, that they hate it. Seriously, when I got into trouble when I was younger, my mom would punish me by taking my books away. No joke. So, I thought this idea was just the coolest thing ever, especially since I love the idea of a secret hiding place.
 Just find a wooden box, chop the spines off of a few books (preferably books you have already read), and super glue them onto the side. And if you want it to be pretty on the inside, mod podge and paint are wonderful.

I am so doing this, ladies and gentlemen! Aren’t they pretty? And – as with pretty much everything else I have posted, these are super simple to make. All you will need are a few glass bottles, jars, or containers and some glass enamel paint, which is sold at most craft supply stores. I am particularly in love with turquoise and coral, so I’m thinking of using those colors.
So first, you’re going to do is wash and dry the bottles thoroughly. Then you’re going to want to pour the paint’s surface condition into it and swirl it around. Dump the excess out, stand it upside down, and let it dry for an hour. Then pour in plenty of enamel inside. Again, swirl it around, dump out the extra, stand it upside down, and let it dry for 48 hours (make sure during that first hour to occasionally wipe of any excess from the brim with a damp cloth).
Then you can add all kinds of pretty things, like flowers and jewelry and pens and candy. Who doesn’t love candy? Anyhow, there you have it! Have a lovely day, sweets! 🙂
Good morning all! I don’t have class until eleven, so I thought I’d start the day off with a craft. I actually bought all of these materials last night at WalMart when I know for a fact that you can at least buy some plates and nice candle stick holders for cheaper at the dollar store. I know, I know! But in my defense, every dollar store in town was closed last night when I found my inspiration. And while I don’t necessarily need any more storage space at the moment, I am very happy with the way this turned out! Here’s what you’ll need:

Or any other variation…
This is SO easy! Just take all of the stickers off and glue it all together. Seriously. Like this.


My finished product
